Resource calendars
A resource calendar is an extra account that can be used to represent a resource such as a room or a piece of equipment. The calendar in this account can be used to schedule bookings for that room or equipment.
- Creating a resource calendar
- Logging into a resource calendar using Outlook 2013
- Setting up permissions for a calendar
- Set a resource to automatically accept bookings
- Set up a resource so that a delegate accepts/declines bookings
- Open a resource calendar that I have been given permission to access
- Book a resource for which I am not a delegate
Creating a resource calendar
If you wish to have a new resource calendar created, contact the CSD Service Desk. A resource account will require its own username and password. The username should be no more than 20 characters long, and descriptive to identify the type of resource e.g. csd-meeting-room.
The password needs to be a minimum of 8 characters long.
Logging into a resource calendar using Outlook
Please note in order to administer resources, and control who can access them, then you need to be using Microsoft Outlook. You cannot use Webmail to manage access permissions.
Once a resource has been created you will have been given a username and password for the resource. To manage setting and permissions for other users on the resource you need to login to Outlook using this username and password. The easiest way to do this is to log on to your MWS PC using the resource account, then open Outlook to manage the permisisons for the account. The only time you need to login as a resource account are when you need to update the permissions.
Setting up permissions for a calendar
By default, nobody in the University can view your resource calendar, unless you specifically grant them permission to do so. The following example explains how to grant users permissions to update a resource calendar.
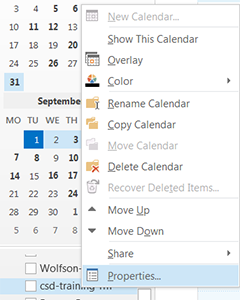
- Logon to your MWS PC with the resource username and password and open Outlook.
- Click on Calendar to go to Calendar view.
- In the left hand column, right click on Calendar, listed under My Calendar, and select Properties.
- In the window that opens, click on the Permissions tab.
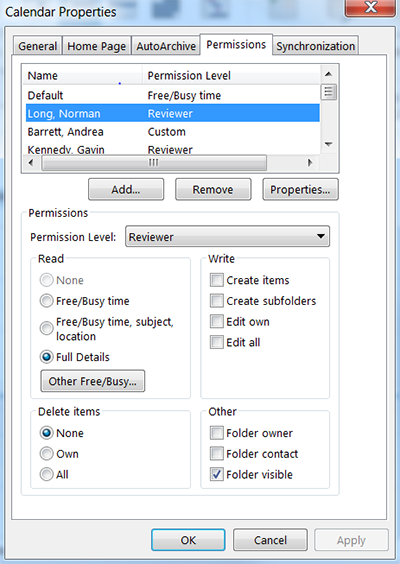
- To give specific people permission to update the calendar first click on the Add…button.
- Next to Search: type in the surname of first person that you want to give access to the calendar. The Global Address List will find all people with this surname.
- Highlight the name of the person you are looking for, and click on the Add -> button.
- You can repeat this search any number of times to add multiple people.
- When you have finished adding users, click OK.
- All people you have just added will now be highlighted in the Permissions Window. To change the permissions for all of these users choose the relevant option from the Permission Level drop-down box. Reviewer will give people read access, Editor will give people read/write access.
- When you have finished setting the permissions, click OK.
Set a resource to automatically accept bookings
If you want people to be able to book a resource without having an administrative user accept/cancel the bookings, please contact the CSD Service Desk.
Set up a resource so that a delegate accepts/declines bookings
If you want to administer a resource so that you control which bookings are accepted/cancelled follow the steps below:
- Log on to your MWS PC with the resource username and password and open Outlook.
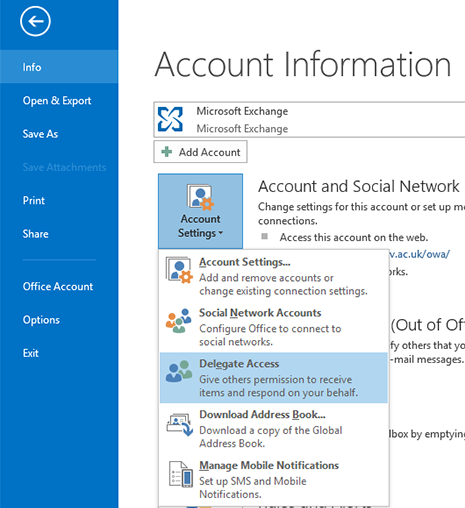
- Click on the File menu.
- Click on the Account Settings button then select Delegate Access.
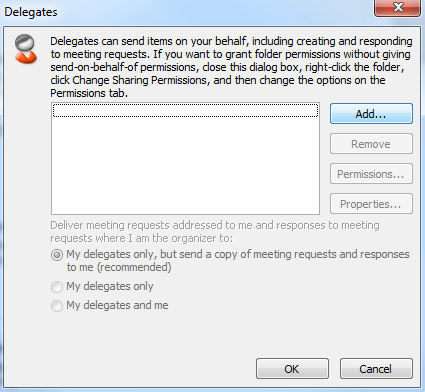
- In the Delegates window click on the Add… button.
- Find the user in the that you want to add.
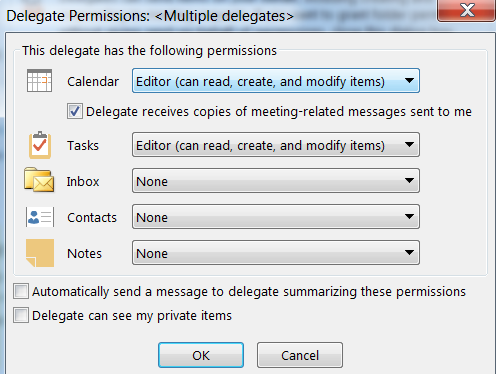
- Setup the necessary permissions for this user. In this case you probably only need to setup calendar permissions (see screenshot below).
- Tick the box Delegate receives copies of meeting-related messages sent to me.
- Click OK.
- In the Delegates window, select My delegates only. This means that meeting requests sent to the resource are now sent to the delegate user instead.
- If anyone now tries to book the resource the delegate user will receive a meeting notification in their Inbox. They can then accept or cancel these requests as they come in.
Open a resource calendar that I have been given permission to access
- Login to Outlook 2013 using your own username and password.
- Select File > Open & Export then choose Other User’s Folder.
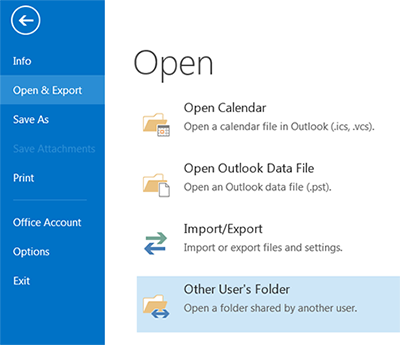
- Type in the name of the resource into the Name… box, and select Calendar in the Folder type: box.
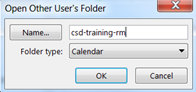
- This will open the resource calendar alongside your own calendar.
Depending on the permissions you have then you will be able to view/update the calendar accordingly.
Book a resource for which I am not a delegate
If you are not setup as a delegate then you will need to create a new meeting request that includes the resource name as an attendee.
Example - You are creating a new meeting that includes a number of people, and a meeting room, in the list of attendees:
- Create a new meeting request by going to your Calendar and clicking New Meeting.
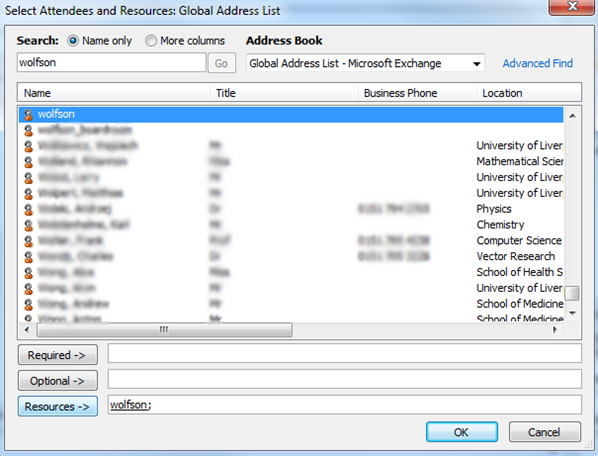
- Click on To and select the people to attend your meetings. Also find your resource in the address book, highlight it but click the Resources button.
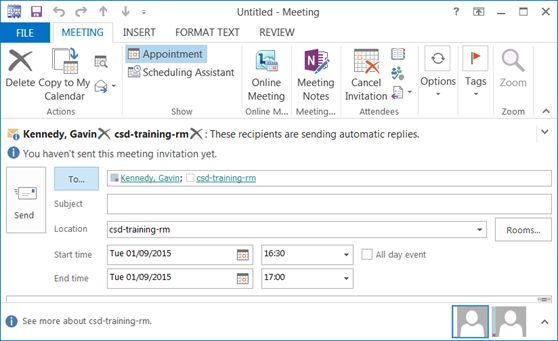
- Here is an example meeting with the resource "csd-training-rm" included in the invitation. Notice that the resource is listed in the To… box, and the Location: box. This is done by clicking on the Resources button when adding attendees.
- Click on Send to arrange the meeting. This will email the attendees including the resource administrator.